I begin, today, a series of articles in which I will share all I know and I keep learning about photography. It doesn't warrant the title of "tutorial" but I'm hoping some will find it useful.
We will begin with the first step in post-processing a photo, its digital developing. Yes, digital photos also get developed!
To begin with, we should always shoot in [RAW] format. Why? Here are some of the many reasons:
- RAW format contains all the raw information gathered by the camera's sensor (not compressed nor processed)
- Images are made up of 3 channels: RGB (Red Green Blue) and, for each channel, the JPEG format (8 bits) contains 256 levels of information, that is, it can contain 16,7 million colours (that's the maximum amount of colour combinations of all three channels). The RAW format contains 65,000 levels for each channel which means over 280 TRILLION colour combinations. This implies...
- Improved final quality
- Greater flexibility: with all that information (much of which isn't perceptible to the human eye) will multiply the possibilities of what we can achieve with a photo.
- MUCH larger dynamic range
What all this really implies will be seen over the next articles (HDR from a single shot, separate channel processing, high lights recovery and an extremely long etc which is largely impossible to do with JPEG.
Of course,m all this flexibility comes at a cost: memory. The RAW images are pure raw unprocessed data, all the sensor can capture. This implies that, a single photo of a 10.2MP (mega-pixel) camera such as my EOS450D will take up around 10Mb. For me, the advantages far outweigh the price :-)
There are several tools for the digital developing of RAW images (see the wikipedia link above). I will be using Adobe's Camera RAW 5.7, included in their Creative Suite 4 (which I'm lucky enough to own through my work). And, as an example, I will use [this photo] which you can download, for practicing purpouses, from [here].
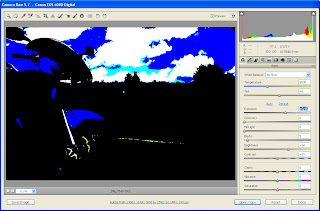
Once opened, the following screen will show:
This screen is divided into several panels: Preview panel, Histogram (very important!), Tool panel and the button section. The Preview will show the effects of our actions on the Tools panel. The Tools panels (9 in total) are where we will be modifying the images parameters. The button section will enable us to save, open the image, etc. We'll begin with the Histogram, which represents graphically. From left to right we have the brightness values (black on the left, white on the right) which are represented in lines. The highter the line, the more information for that value. Each colour chanel has its own graphic. Overlaps are shown in white or the corresponding colour combination.
On the top corners we can see the control which, when pressed, will show the burnt areas (right button, shows burnt in red in the Preview) or absolute black (left button, showing blue in Preview). Both red and blue show areas with no detail information or "flat" (totally black or totally white)areas.
This panel will also show information on how the photo was shot: the f value (7.1), shutter speed (1/125s), sensor sensitivity (ISO), the lens used (18-55) and the focal distance (18mm). All these I will talk about in other articles.
The Tool panel

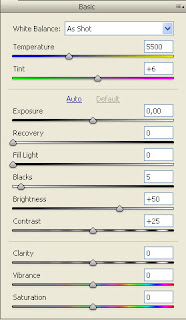
 The first tool panel is the Basic panel, maybe the most important one. From here we will control Temperature, Exposure and (general) Saturation. As a rule of thumb we will start with "day" light values, that is 5500 and 0 tint. From this we will balance to taste, depending on what we wish to transmit and the conditions in which the shot was taken, (bluer and colder to the left and redder and warmer to the right).
For exposure we have Auto values or Default values (in case we want to go back to the original values) but we will act on the controls. To help ourselves we can press the ALT hey as we use the Exposure, Recovery and Blacks sliders. This will change the preview panel so we can see burnt areas in white going towards black as the unburnt information is spread out.
 If we want to see the results on the actual image we will release the ALT key. When doing this in Blacks, the preview will show white for non-black information and towards black as the information is lost towards black. Again, as a rule of thumb we will aim to remove all burnt areas and level blacks so only general shapes are shown in light yellow. How much burnt or black we allow depends on taste and our goal. Other controls include Fill light (to lighten gently), Brightness (we will generally avoid going over the 100 value) and Contrast.
 The lower section will allow uys to control Clarity, Vibrance and (general) colour Saturation. To see the effects it is best to experiment.
The result we are aiming for is a histogram which shows as much information as possible towards the middle area or even a little to the right, trying to avoid flat areas (areas where detail is lost to white or black), with the colour balance we wish to obtain.
Remember this is just the beginning (althought the most important part) of the process. Experience will teach us how much we can attain with the Camera RAW according to what we finally want out of the photo.
All parameter changes are stored (when we click "Done" or "Open" or "Save as") in an XMP file, leaving the original file absolutely intact. If we want to start over all we need to do is remove this XMP file or press "Default" on the exposure section.
(to be continued...)


